But if you don’t want to see the formatting marks, simply toggle the paragraph button–seen in the middle of the ribbon above or as described in the video–to turn them off. If the toggle button didn’t work, you may try this method.
There are several different characters, such as a space and tab, which Word does not normally display on the screen. In addition, there are several special characters that Word uses for housekeeping purposes. For instance, Word uses special characters to indicate the end of a line or the end of a paragraph. You can display these special characters, which Word refers to as nonprinting characters, by following these steps: • Display the Word Options dialog box. (In Word 2007 click the Office button and then click Word Options.
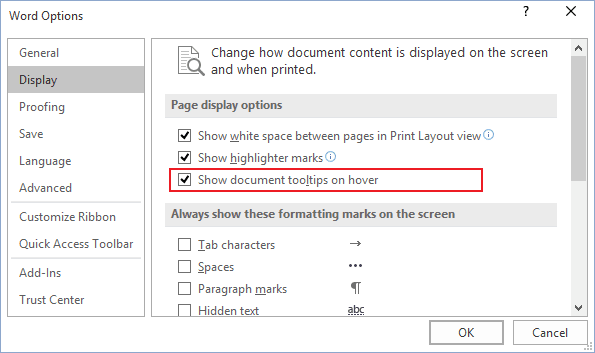
In Word 2010 and Word 2013 display the File tab of the ribbon and then click Options.) • Click Display at the left side of the dialog box. Quickbooks for mac cheat sheet. (See Figure 1.) Figure 1. The display options in the Word Options dialog box.• In the Always Show These Formatting Marks On the Screen section, select the characters you want Word to display. • Click on OK.
Why would you want to display these characters? Quite simply because it is much easier to understand spacing when the characters are displayed.
You can quickly tell, for instance, when you have inserted two spaces between words or added an extra carriage return. This allows you to more accurately control the look of your document and what it contains. There is also a quick way you can turn nonprinting characters on and off using the ribbon. Display the Home tab of the ribbon and look for a tool in the Paragraph group that looks like a backwards P. (Technically this character is called a pilcrow.) This tool is known as the Show/Hide tool. Clicking it (or pressing Ctrl+*) toggles the condition of the Show All Formatting Marks checkbox in the dialog box shown earlier.
Thus, it can quickly turn on and off the nonprinting character display. There is one interesting 'gottcha' to this, however. In the dialog box you can select to individually display or hide specific nonprinting characters. If you select the checkboxes for all these individual characters, using the Show/Hide tool still only toggles the Show All Formatting Marks checkbox—the individual settings for specific characters are not affected at all.
There are a lot of options available on the market for perfect bound bookbinding equipment. Most are expensive and geared toward companies running fulltime binderies. Others are pitched at the business market and focus on creating bound reports. There are even a few looking to create short runs of perfect bound books. But, they all cost thousands of dollars. Involved some extremely low-tech bookbinding tools – paint stirrers and binding clamps. It was tricky to get the pages lined up, position the stirrers, and get the clamps on (they got in the way when applying glue, too).
Finally, there was no good way to add the covers. I needed a better solution. An important resource in my bookbinding journey is Nathan DeStephano’s Easy Bookbinding course. In addition to all of the information about designing, formatting, and printing books, he includes detailed instructions for a bookbinding jig that is cheap and easy to make. In my research I had seen a few similar products, such as the $135.95 version sold by GigaBooks, and decided to come up with a version of my own. [] The main difference between my bookbinding jig and others available is that I made mine entirely out of scrap lumber (I’m a cheap guy!!!) The whole thing cost just a few dollars for the metal hardware. The first day I tried it I made 2 books – with covers – that were much better than any others I had made previously.
The pages were all properly aligned, the spines were properly compressed for gluing, and the covers fit perfectly. A bookbinding jig doesn’t have to be overly complicated. It’s main purpose is to provide 2 surfaces that are aligned at a 90 degree angle to make it easy to square up the pages you are gluing together (a process known as jogging), and clamping down the spine edge during gluing to keep the pages compressed together and stable as the glue is applied and dries. I made all of my critical measurements by laying a sheet of paper from a project onto the main board and tracing the edges. Microsoft office for mac 2011 best price.
From there I was able to work out the placement of the page guides and the press bar. Here is a look at the jig in action as I bound my first book. The book block and cover are in the jig and the press bar is clamped down. I applied glue, folded over the cover, and let everything dry. For this test book I used 5 minute epoxy for the glue and it produced a very sturdy binding – it’s just a little difficult to work with given the fast set time.