To open the Preferences dialog box, choose Edit > Preferences (Windows) or Premiere Pro > Preferences (Mac OS), and select the category of preferences you want to change. To restore default preference settings, hold down Alt (Windows) or Option (Mac OS) while the application is starting.
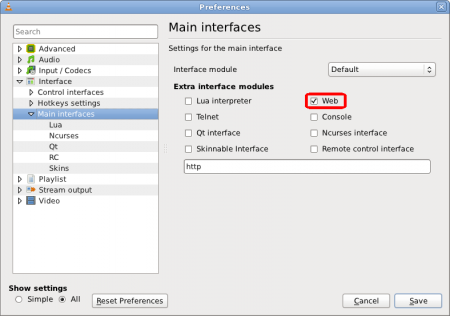
1st search result in google, and to think that you've waited 2hrs. Mac Right-click on the type of file you want to always open with VLC. Click 'Get Info'. In the 'Open With' section, select VLC from the drop-down menu.
To apply this change to all files of this type, click the 'Change All' button. For optical media, like CDs or DVDs, go to Apple -> System Preferences and choose 'CDs/DVDs' in the Hardware section. Choose 'Other Application' from the respective popup menu button.
The list is alphabetical, so VLC should be near the bottom of the list.
• To open the Preferences dialog box, choose Edit > Preferences (Windows) or Premiere Pro > Preferences (Mac OS), and select the category of preferences you want to change. • To restore default preference settings, hold down Alt (Windows) or Option (Mac OS) while the application is starting. You can release the Alt key or Option key when the splash screen appears. • To restore default preference settings and plug-in cache at the same time, hold down Shift-Alt (Windows) or Shift-Option (Mac OS) while the application is starting. Release the Shift-Alt keys or Shift-Option key when the splash screen appears. Timeline is 709, display is P3. Without color management enabled, the display appearance would be too saturated and would not match your export.
Timeline is 2020, display is not 2020.  Without color management enabled, the display (709, sRGB, or P3) would look washed out and would not match your export. Timeline is 709, display is sRGB. With color management disabled, the display matches what a YouTube viewer will see on her sRGB display, which will be slightly washed out (gamma ~0.9) compared to a 709 reference monitor.
With color management enabled, the mid-tones on the sRGB display should match a 709 reference monitor, but some shadow details are lost, as 8bit sRGB encoding in the shadows don't have the fine granularity of the 8-bit 709 shadows; the 20 lowest 709 codes are crunched into the 7 lowest sRGB codes. Timeline and display are both 709.
There is no need to enable color management as it would make no difference. Note: Premiere Pro does not color manage external transmit monitors hooked up through video cards from companies like AJA or Blackmagic. Configure that hardware outside Premiere Pro. Premiere Pro, however, does color manage a secondary computer monitor used as a transmit monitor. It is part of the desktop of the operating system - hooked up through HDMI, Display Port, DVI, or Thunderbolt. Enabling Display Color Management does not change the colors in your exported files. It only manages the colors that you see displayed on your monitor.
It is necessary so that you can accurately judge what the colors look like on a true Rec709 display (HDTV for example). In the past, it was necessary to manually set your OS display profile to Rec709 to view accurate colors, and sometimes it was not possible. Display color management takes the guesswork and displays correct colors no matter what ICC profile your display is set to in the OS. Creates keyframes only at points that don’t have a linear relationship to the start and end keyframes. For example, if you are automating a fade from 0 dB to –12 dB.
With this option selected, Premiere Pro creates keyframes only at the points that represent an increase in value from the beginning (0 dB) and ending (–12 dB) keyframes. If you don’t select this option, Premiere Pro creates several incremental keyframes of identical values between those two points, depending on the speed at which you change the value. This option is selected by default.
In the Audio Hardware pane of the Preferences dialog box ( Edit > Preferences > Audio Hardware), you can specify the computer audio device and settings. You can also specify the ASIO and MME settings (Windows only), or CoreAudio setting (Mac OS only) that Premiere Pro uses for audio playback and recording. When you connect an audio hardware device, the hardware settings for that device type, such as default input, default output, master clock, latency, and sample rate are loaded in this dialog box. For example, the following screen shows the settings for a connected MME device (Windows) in which you can modify the default selections in properties.
When you configure inputs and outputs for recording and playback, Adobe Premiere Pro can use these kinds of sound card drivers: In Windows, ASIO drivers support professional cards and MME drivers typically support standard cards. In Mac OS, CoreAudio drivers support both professional and standard cards. ASIO and CoreAudio drivers are preferable because they provide better performance and lower latency.